Hi All, long time lurker, first time poster.
I completed the mechanical construction of my AR3 a few months ago. I'm sure you've seen enough pictures of that process so I will spare you any more. Where my project differs from standard is mostly in the program. I'll start with the functions that are currently operational.
All motion control processing done in micro controller. (forward/reverse kinematics and motion profiling).
Code is non-blocking. There are no delay() calls or loops waiting for something to complete. This allows the micro controller to be processing other functions even while the arm is moving.
All motions are programmed in engineering units. So joint positions are degrees with speed using degrees/s and acceleration using degrees/s/s. Likewise for linear moves but using mm.
Synchronized joint motions require each joint to report the amount of time to reach destination then all joints adjust to match the longest time duration (all joints complete motion at the same time).
Converted to Teensy4.1 for higher speed and USB host capabilities. Reverse kinematics takes 22 microseconds on the Teensy4.1.
Connect PS3 controller directly to Teensy 4.1 for manual control.
Can use the PS3 analog sticks to control joints with velocity control so you can adjust the speed continually while moving each joint (and move multiple joints at once). There are enough controls on the PS3 controller to control all 6 joints without changing modes. Also using the controller "rumble" feature when a joint position limit is reached.
Use the PS3 analog sticks to control the robot in XYZ coordinate space. The left analog stick allows you to freely move around the XY plane while holding a constant Z position. The left/right analog triggers allow increasing and decreasing the Z position. The right analog stick adjusts the wrist orientation. All of these motions can occur at the same time which makes it fun to drive the robot around.
That's about all that has been done so far.
To do:
Create a way to set and store waypoints so the robot can complete a useful task without modifying the arduino code. This could be done over USB serial or maybe it could be web based over Wifi? undecided so far.
I'll try and update this thread as the program gets improved and maybe post some videos if there's any interest.
Thanks for stopping by,
Redlunn
An additional difference that I forgot to mention is that the robot is running in "true" closed loop position control, so the motors do whatever is necessary to satisfy the encoders.
A new feature since my last post is using the PS3 controller's accelerometers and gyroscopes to adjust the yaw/pitch/roll by simply moving the controller.
Here is a video showing how some of these features work.

@redlunn That’s pretty amazing! I’m about to finish my build today and start it up. I feel like it’ll take a small miracle for it to work straight up the first time.

I would say this is awesome and a great capability. Personally I would love to use your program.
I'm still undertaking my build, so would you recommend me/us upgrading to Teensy4.1? Does Teensy4.1 still support the existing AR3 software in the mean time?
The main issue with the Teensy 4.1 on the AR3 is that it is not 5V tolerant like the Teensy 3.5. So you have to reduce the voltage of encoder signals and possibly the limit switch inputs. Other than that it should be a drop in replacement (though I never tried running the original AR3 software on the Teensy 4.1). I guess I would recommend sticking with the 3.5 and getting everything working then possibly upgrading in future.
I'd be happy to share my program with the community but it is missing some key features to really be usable. Primarily the ability to store, modify, and run through a sequence of commands. My goal is to get the motion control side of the program able to run the robot through all necessary motions first, then work on the command system.
@redlunn Thanks for the advice Redlunn - I'lll stick with Teensy3.5 and watch your thread for future updates. Best wishes for your efforts!
Hi Redlunn, the program update looks very impressive. Does it mean that PC is not required, since all computation is on Teensy 4.1? Is the code ready to share? Thanks!
The current status of my project uses a modified version of the ARCs software to send move commands (rather than axis positions) to the teensy. From there the teensy plans out the axis positions. I suppose the move commands could come from anywhere, including the SD card on the teensy if you wanted to run without a PC. The code is in the middle of a major update right now with switching to multiturn absolute encoders on RS485. No more home switches, yay!!

Very impressive work - I join the chorus of people interested in your program !!!
I have 2 updates planned for the next few days, now that my parts have arrived...
First, I will be testing 2 multiturn absolute encoders (CUI AMT212D) which communicate on an RS485 bus at 2 MHz. If it works as expected it should allow removing the encoder and home switch wiring and replacing it with a 2 wire bus which will daisy chain to all encoders.
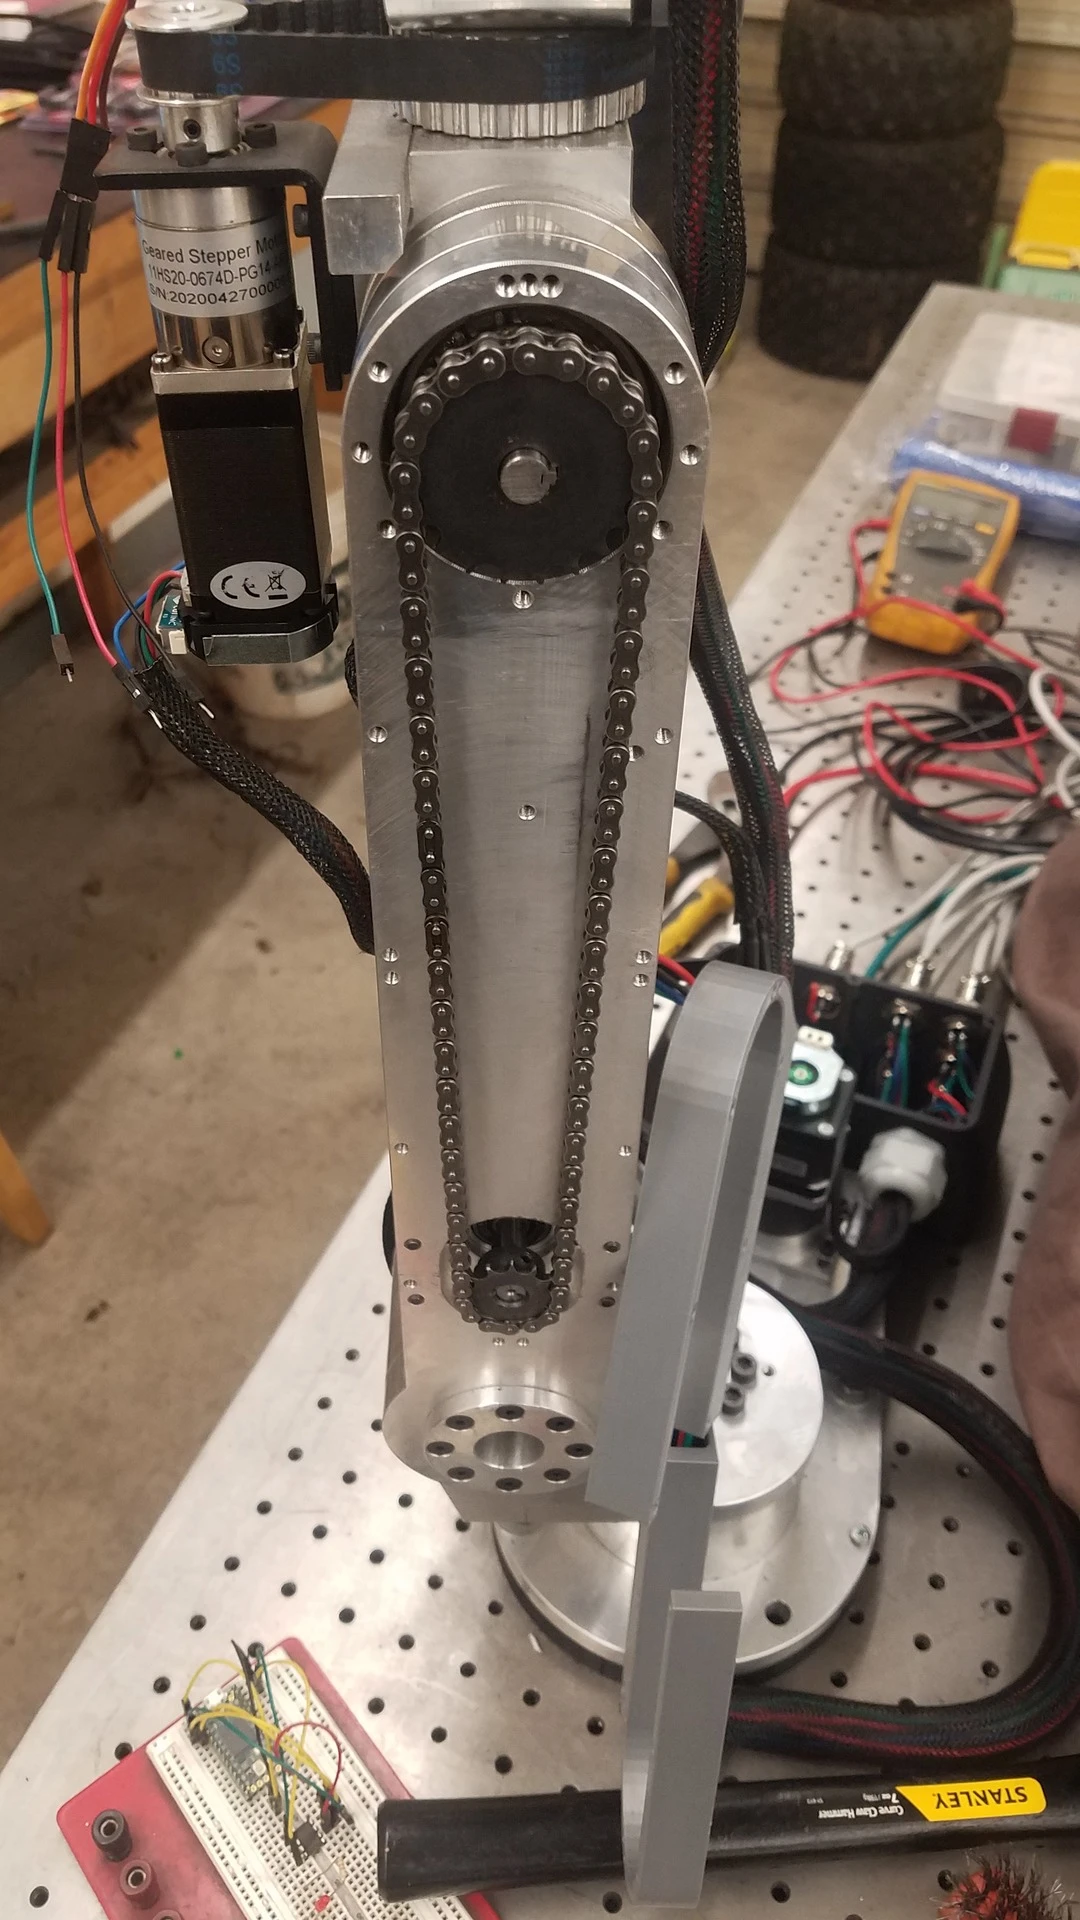
The second task involves some mechanical rework. The J3 joint seems to be the weak point for load capacity and the easiest solution I see is to change the upper chain sprocket to a part with more teeth. I have found a 20 tooth sprocket will fit in the 3D printed housing and should allow for 53% more torque at the joint. A side benefit is the reduction of apparent backlash from the J3 stepper gearbox. I will update with results but I won't get much testing until the encoder experiment is complete.
Redlunn
It took awhile but I now have one multi turn encoder communicating on an rs485 bus with a spare teensy 4.0 I had handy. The encoders are half duplex so the transmit and receive takes place on the same wires. At 2mhz there isn't much time to switch between transmit and receive. I was unable to find any sample code or libraries for this task so it had to be developed from the data sheet and experimentation. Next step is to add more encoders to the bus. Once that works then the encoders and code can get moved into the robot program.
Redlunn
https://anninrobotics.com/wp-content/uploads/2025/07/AR3-With-Custom-Program.avif
I've now added a second RS485 multi-turn encoder and can read both at over 1000 Hz so 4 more have been ordered to complete the project. The wiring on these encoders is unfortunately tedious (and small) but I think it will pay off in the end. The code is fairly simple and the wiring savings is significant. I'll post an update once all 6 encoders are active.
Redlunn
Well, I'm committed now. All
encoder and home switch wiring has been removed. Also finished the J3 sprocket ratio change.

that makes for a clean wiring box ! Great job !
Hi Redlunn, I was looking into a similar solution with an absolute encoder before I noticed this post. Please keep us updated on your progression!
Have you already tested the new sprocket size?