

AR4.EXE 6.7 question
What are the second set of J1..J9 check boxes for? If I click on Calibrate J1 only the second set doesn't need to be checked for J1. Auto Calibrate works fine with just J1..J3.
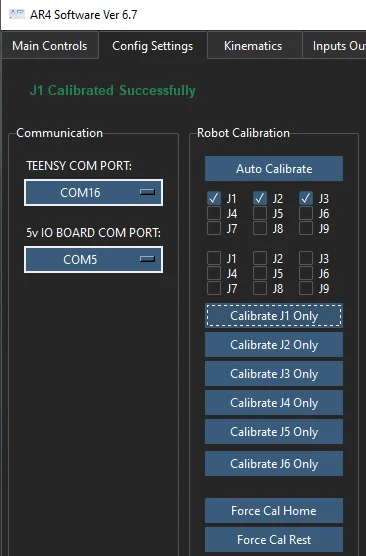

You can calibrate the robot in 2 stages. In some cases if your gripper or tool holder is too large it can hit the robot arm when J2 and J3 are retracted in the calibrate negative limit position - therefore it helps to have the option to calibrate the wrist joints in a 2nd stage. The first group of checkboxes is for the first stage and the second group is for the 2nd stage. I have left it configurable so you can choose any combination you choose. Please see the startup tutorial video at 14:28 https://youtu.be/F8wv6KpZAZk?si=T9KOaFH-te-NAHCw&t=868

Chris Annin Thanks. I must have missed that. Yesterday I was still running 6.5. Now I've updated both the Teensy 4.1 and set the desktop shortcut to 6.7. Guess I'll have to watch the video again.
Is there a pdf reference to the xbox hand control? I watched the video on it but lost track of what button did what.
I still have only 3 axis operational so I find the AR4.exe software hangs if I ask it to move an axis that doesn't exist.
Chris Annin There's also lots of room in that column to add test that states
Auto Calibrate
Stage 1
...
Stage 2